Image Tutorial: Hot Dog or Not?
In this tutorial,
we will be using EIR
to train deep learning models
for image classification.
Specifically, we will be
training our models in the
important task of classifying
whether an image contains
a hot dog or not
We will be using a subset of the Food-101 dataset,
originally introduced here
To download the data and configurations for this part of the tutorial,
use this link.
Note that this tutorial assumes that you are already familiar with the basic functionality of the framework (see Genotype Tutorial: Ancestry Prediction). If you have not already, it can also be useful to go over the sequence tutorial (see Sequence Tutorial: Movie Reviews and Peptides).
A - Baseline
eir_tutorials/a_using_eir/05_image_tutorial/
├── conf
│   ├── globals.yaml
│   ├── inputs_efficientnet_b0.yaml
│   ├── inputs_resnet18.yaml
│   ├── inputs.yaml
│   └── output.yaml
└── data
    └── hot_dog_not_hot_dog
        ├── food_images
        └── labels.csv
Looking at the data we are working with, we can indeed see that it contains images of hot dogs and all kinds of other food:


I did not know drinking coffee/cacao with hot dogs was a thing. Anyway, now we will train a simple residual network from scratch to get a little baseline. The image models we be using come from the excellent timm library, which includes those used in this tutorial and many more!
To the configuration!
attribution_analysis:
  compute_attributions: true
  max_attributions_per_class: 10
basic_experiment:
  batch_size: 32
  dataloader_workers: 0
  memory_dataset: true
  n_epochs: 200
  output_folder: eir_tutorials/tutorial_runs/a_using_eir/tutorial_05_is_it_a_hot_dog
  valid_size: 0.1
evaluation_checkpoint:
  checkpoint_interval: 100
  n_saved_models: 1
  sample_interval: 100
training_control:
  mixing_alpha: 0.5
visualization_logging:
  plot_skip_steps: 0
input_info:
  input_source: eir_tutorials/a_using_eir/05_image_tutorial/data/hot_dog_not_hot_dog/food_images
  input_name: hot_dog
  input_type: image

input_type_info:
  mixing_subtype: "cutmix"
  size:
    - 64

model_config:
  model_type: "ResNet"
  model_init_config:
    layers: [1, 1, 1, 1]
    block: "BasicBlock"

interpretation_config:
    num_samples_to_interpret: 30
output_info:
        output_source: eir_tutorials/a_using_eir/05_image_tutorial/data/hot_dog_not_hot_dog/labels.csv
        output_name: hot_dog_output
        output_type: tabular

output_type_info:
        target_cat_columns:
                - CLASS
As usually, we do our training with the following command:
eirtrain \
--global_configs eir_tutorials/a_using_eir/05_image_tutorial/conf/globals.yaml \
--input_configs eir_tutorials/a_using_eir/05_image_tutorial/conf/inputs.yaml \
--output_configs eir_tutorials/a_using_eir/05_image_tutorial/conf/output.yaml
Note
Training these deep image models can take quite some time if one is using a laptop. If possible, try using a system with a GPU available!
Now for the results, we see the following:
That looks kind of ok, but far from great. Our validation performance is all over the place (a contributing factor could be that our validation set here is very small), and we don’t get a better performance than around 76%. Certainly not good enough for an actual app!
B - Pretrained Image Model
Now we will take advantage of the fact that there exist pretrained models that have been trained on a bunch of data (not just a few pictures of hot dogs and other food) and see whether that helps our performance.
Now our input configuration looks like this:
input_info:
  input_source: eir_tutorials/a_using_eir/05_image_tutorial/data/hot_dog_not_hot_dog/food_images
  input_name: hot_dog_resnet18
  input_type: image

input_type_info:
  mixing_subtype: "cutmix"
  size:
    - 64

model_config:
  model_type: "resnet18"
  pretrained_model: True

interpretation_config:
    num_samples_to_interpret: 30
To train, we run:
eirtrain \
--global_configs eir_tutorials/a_using_eir/05_image_tutorial/conf/globals.yaml \
--input_configs eir_tutorials/a_using_eir/05_image_tutorial/conf/inputs_resnet18.yaml \
--output_configs eir_tutorials/a_using_eir/05_image_tutorial/conf/output.yaml \
--globals.basic_experiment.output_folder=eir_tutorials/tutorial_runs/a_using_eir/tutorial_05_is_it_a_hot_dog_pretrained_resnet
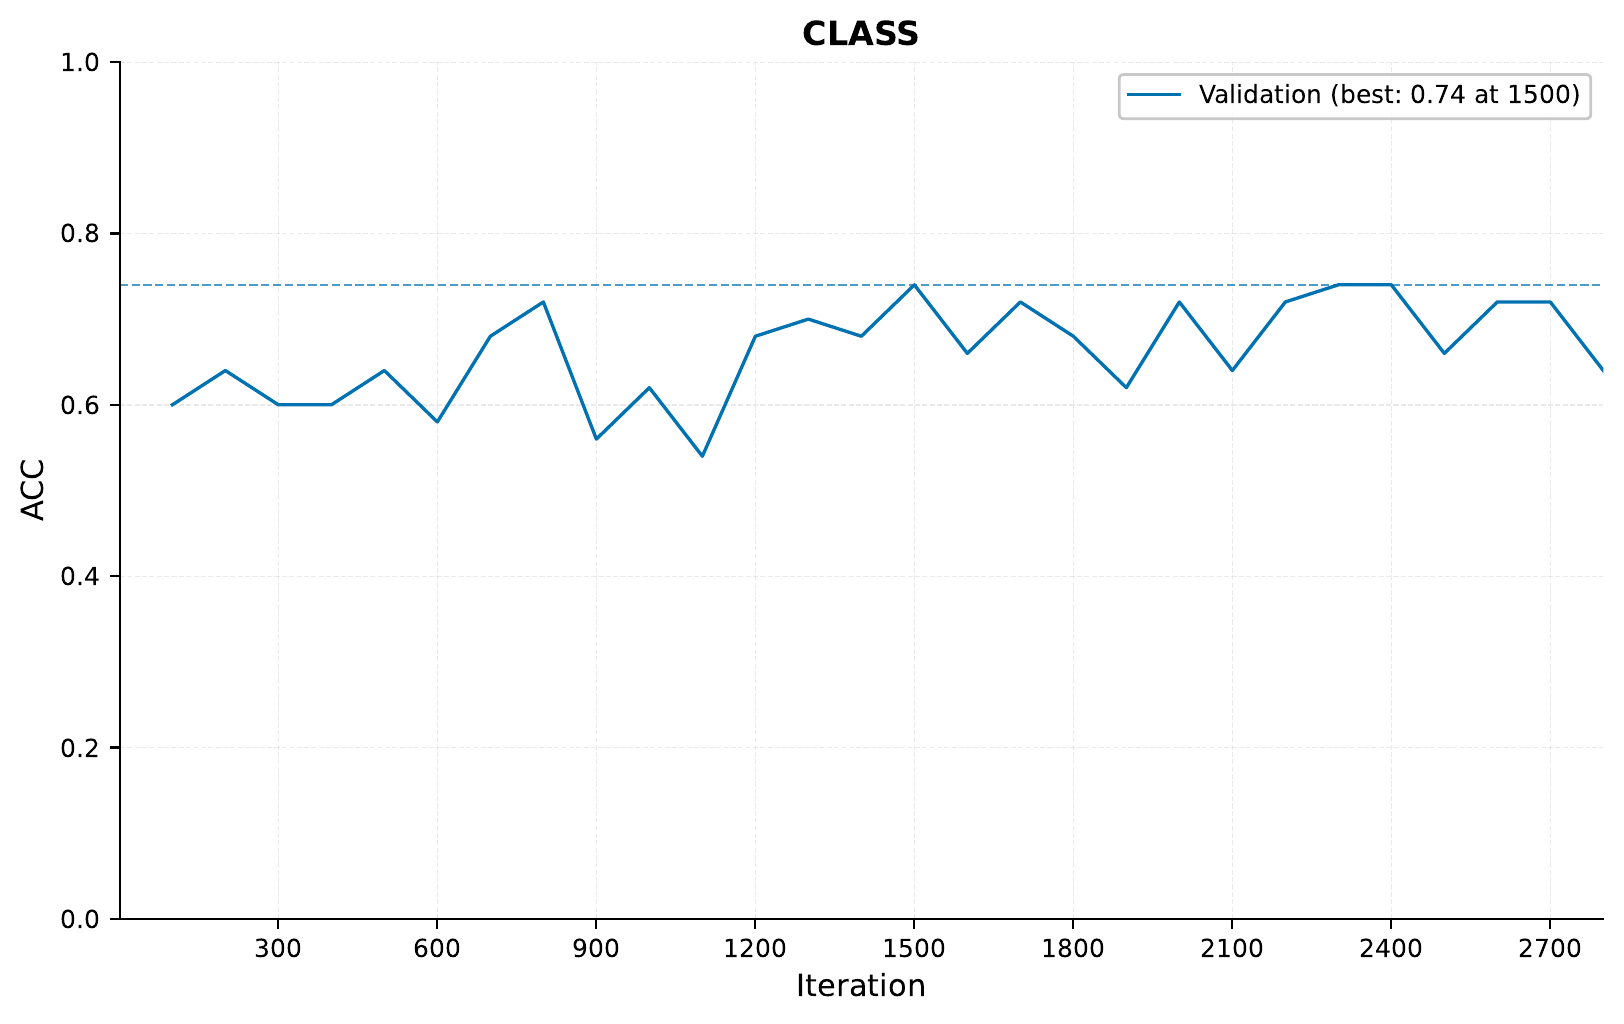
Looking at our performance, we see:

Definitely better!
One factor here could be that
we are training on different
image sizes than
the original model was trained on.
In any case, let’s have a look at what our models
are focusing on
when deciding something is not a hot dog.
(perhaps you already noticed
we set the compute_attributions value to True
in the global configuration):

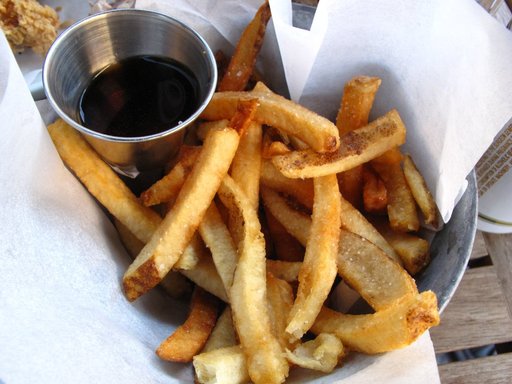
That is not a hot dog alright, and our model seems to agree.
C - Combining pretrained image models
For the last part of this tutorial, we will be combining two pretrained models. We will keep the ResNet18 models as it is, feeding it 64 pixel images. We will also add a EfficientNet-B0 feature extractor, but feed it 224 pixel images.
The configuration for the EfficientNet part looks like this:
input_info:
  input_source: eir_tutorials/a_using_eir/05_image_tutorial/data/hot_dog_not_hot_dog/food_images
  input_name: hot_dog_efficientnet
  input_type: image

input_type_info:
  mixing_subtype: "cutmix"
  size:
    - 224

model_config:
  model_type: "efficientnet_b0"
  pretrained_model: True

interpretation_config:
    num_samples_to_interpret: 30
Training as usual,
notice that we are now passing in both input configurations
to the --input_configs flag.
eirtrain \
--global_configs eir_tutorials/a_using_eir/05_image_tutorial/conf/globals.yaml \
--input_configs eir_tutorials/a_using_eir/05_image_tutorial/conf/inputs_efficientnet_b0.yaml eir_tutorials/a_using_eir/05_image_tutorial/conf/inputs_resnet18.yaml \
--output_configs eir_tutorials/a_using_eir/05_image_tutorial/conf/output.yaml \
--globals.basic_experiment.output_folder=eir_tutorials/tutorial_runs/a_using_eir/tutorial_05_is_it_a_hot_dog_pretrained_combined
Note
Here we are maybe getting ahead of ourselves a little and going straight into combining models. Perhaps only using EfficientNet performs even better. I will leave that task to you, dear reader.
The training and validation curves I got look like so (I got a bit impatient and stopped the run early):

Definitely looks more stable, and better performance than before. As mentioned earlier, we should be careful about trusting these results too much as we have a tiny validation set, but since we are doing a tutorial, we’ll allow it!
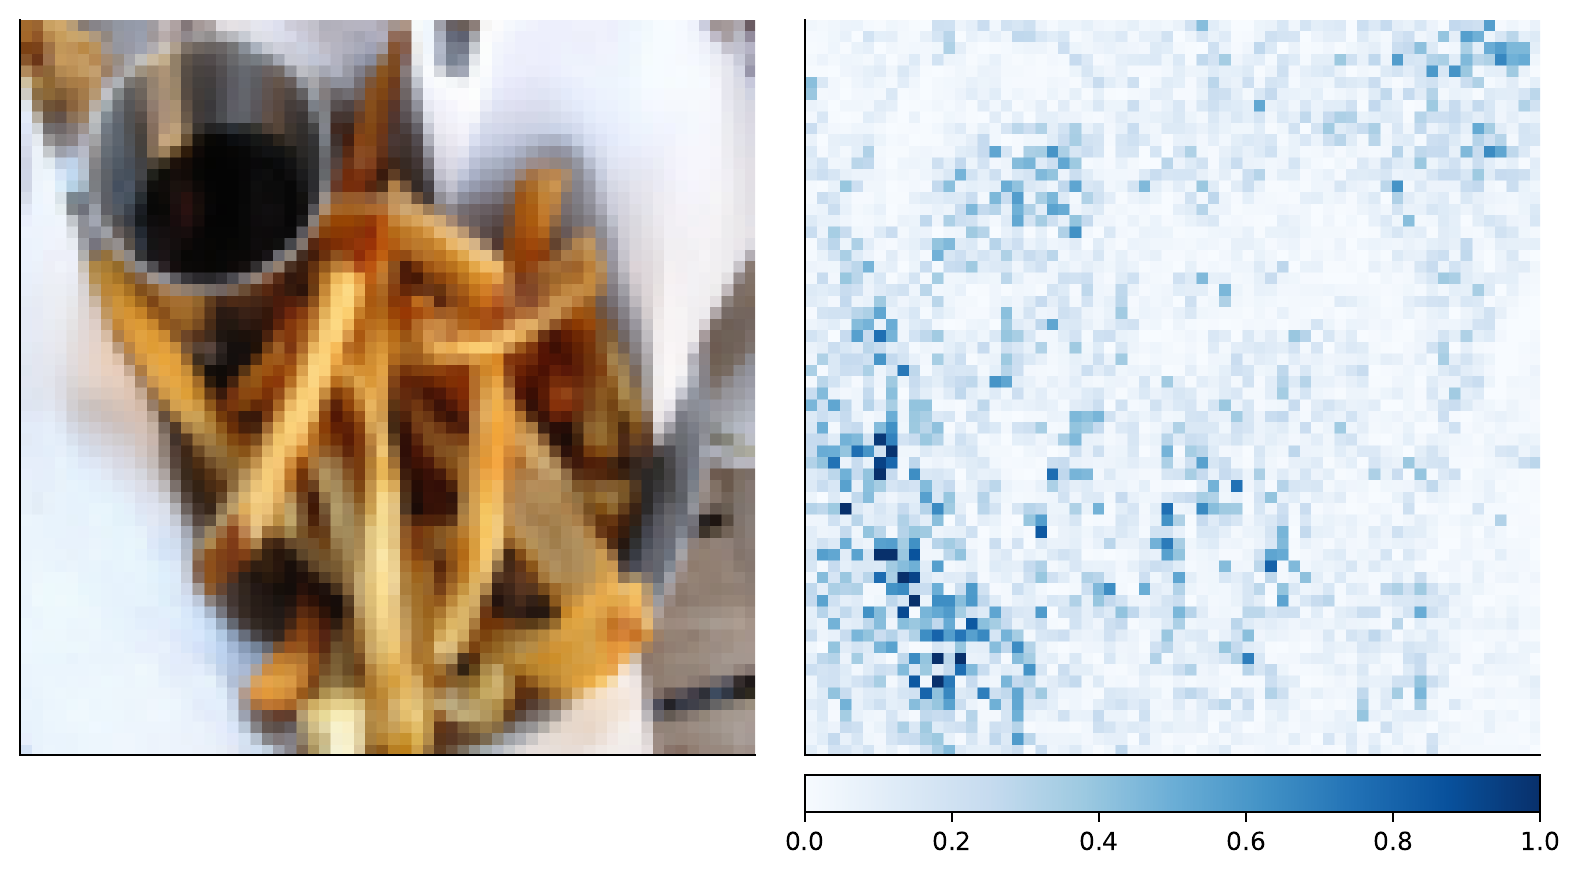
For the last part of this tutorial, let’s have a look at what the our features extractors focus on for an example image.
First the ResNet18 feature extractor:
And then the EfficientNet-B0 feature extractor:
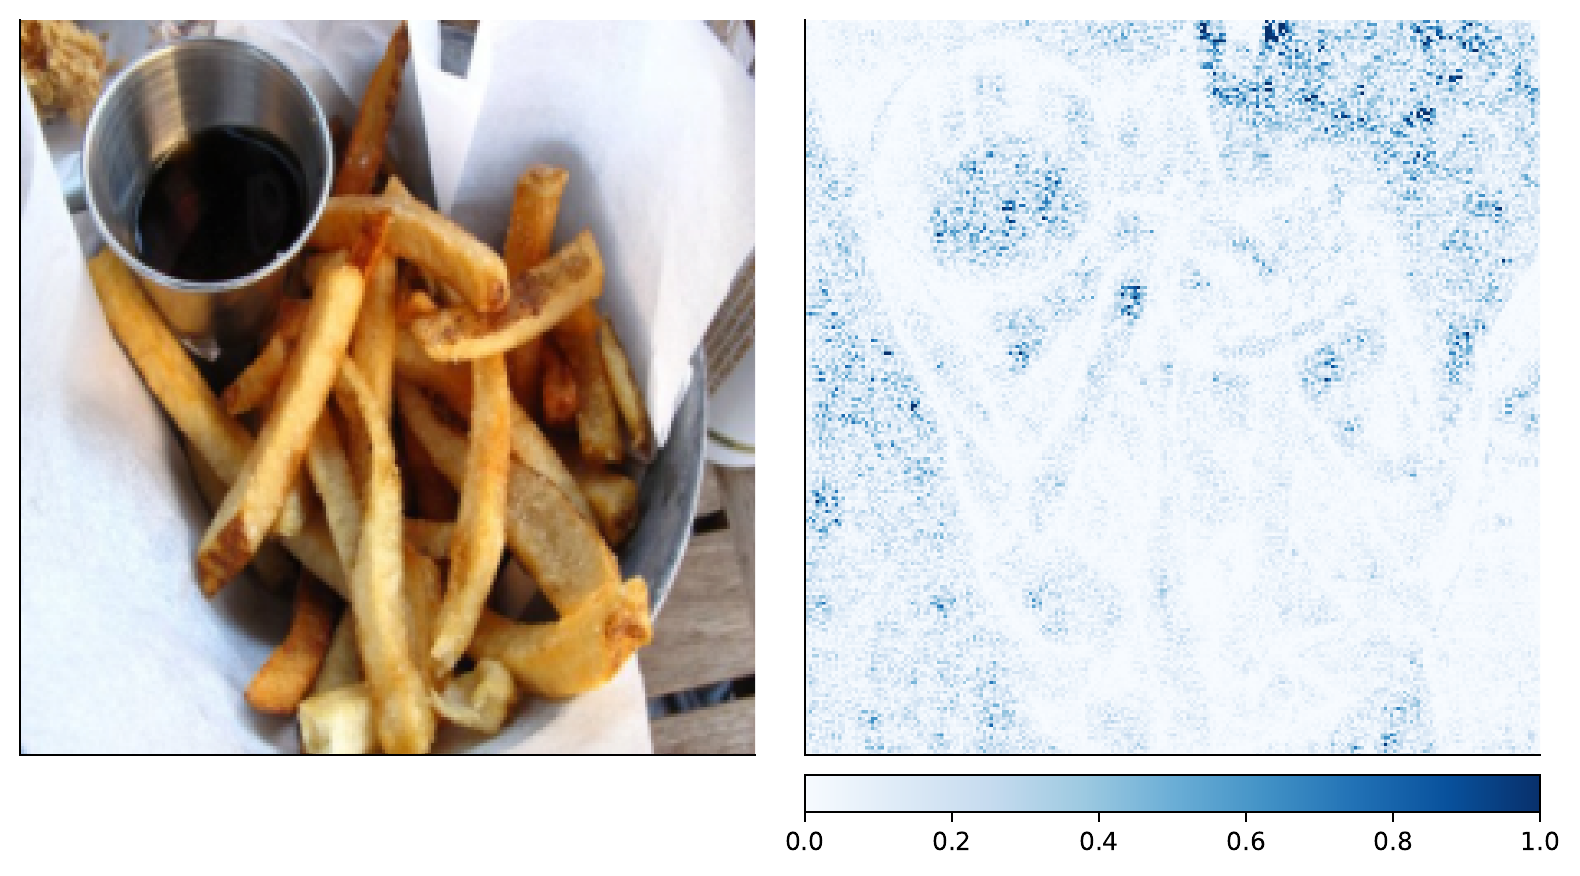
While it’s definitely more clear to the human eye in the ResNet18 case, both feature extractors seem to be focusing on the french fries when deciding that this is indeed, not a hot dog.
D - Serving
In this final section, we demonstrate serving our trained image classification model as a web service and interacting with it using HTTP requests.
Starting the Web Service
To serve the model, use the following command:
eirserve --model-path [MODEL_PATH]
Replace [MODEL_PATH] with the actual path to your trained model. This command initiates a web service that listens for incoming requests.
Here is an example of the command:
eirserve \
--model-path eir_tutorials/tutorial_runs/a_using_eir/tutorial_05_is_it_a_hot_dog_pretrained_combined/saved_models/tutorial_05_is_it_a_hot_dog_pretrained_combined_checkpoint_900_perf-average=0.9674.pt
Sending Requests
With the server running, we can now send requests. For this model, we send different features extracted from the same input image in a batched format.
Here’s an example Python function demonstrating this process:
import base64
from io import BytesIO

import requests
from PIL import Image


def encode_image_to_base64(file_path: str) -> str:
    with Image.open(file_path) as image:
        buffered = BytesIO()
        image.save(buffered, format="JPEG")
        return base64.b64encode(buffered.getvalue()).decode("utf-8")


def send_request(url: str, payload: list[dict]) -> dict:
    response_ = requests.post(url, json=payload)
    response_.raise_for_status()
    return response_.json()


base = (
    "eir_tutorials/a_using_eir/05_image_tutorial/data/hot_dog_not_hot_dog/food_images"
)
payload = [
    {
        "hot_dog_efficientnet": encode_image_to_base64(f"{base}/1040579.jpg"),
        "hot_dog_resnet18": encode_image_to_base64(f"{base}/1040579.jpg"),
    },
    {
        "hot_dog_efficientnet": encode_image_to_base64(f"{base}/108743.jpg"),
        "hot_dog_resnet18": encode_image_to_base64(f"{base}/108743.jpg"),
    },
]

response = send_request(url="http://localhost:8000/predict", payload=payload)
print(response)
When running this, we get the following output:
{
    "result": [
        {
            "hot_dog_output": {
                "CLASS": {
                    "Hot Dog": 0.9630666375160217,
                    "Not Hot Dog": 0.03693333640694618
                }
            }
        },
        {
            "hot_dog_output": {
                "CLASS": {
                    "Hot Dog": 0.03419807553291321,
                    "Not Hot Dog": 0.9658019542694092
                }
            }
        }
    ]
}
Analyzing Responses
Before we going into the responses, let’s view the images that were used for predictions:
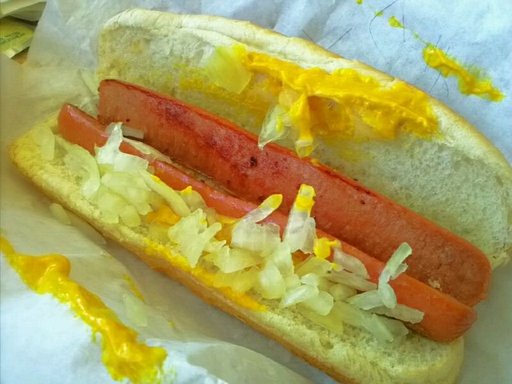
1040579.jpg
108743.jpg
After sending requests to the served model, the responses can be analyzed. These responses provide insights into the model’s predictions based on the input images.
[
    {
        "request": [
            {
                "hot_dog_efficientnet": "eir_tutorials/a_using_eir/05_image_tutorial/data/hot_dog_not_hot_dog/food_images/1040579.jpg",
                "hot_dog_resnet18": "eir_tutorials/a_using_eir/05_image_tutorial/data/hot_dog_not_hot_dog/food_images/1040579.jpg"
            },
            {
                "hot_dog_efficientnet": "eir_tutorials/a_using_eir/05_image_tutorial/data/hot_dog_not_hot_dog/food_images/108743.jpg",
                "hot_dog_resnet18": "eir_tutorials/a_using_eir/05_image_tutorial/data/hot_dog_not_hot_dog/food_images/108743.jpg"
            }
        ],
        "response": {
            "result": [
                {
                    "hot_dog_output": {
                        "CLASS": {
                            "Hot Dog": 0.9630666375160217,
                            "Not Hot Dog": 0.03693333640694618
                        }
                    }
                },
                {
                    "hot_dog_output": {
                        "CLASS": {
                            "Hot Dog": 0.03419807553291321,
                            "Not Hot Dog": 0.9658019542694092
                        }
                    }
                }
            ]
        }
    }
]
With that, we conclude this image tutorial. Thank you for reading!